A Programmable Light-Bot in Java

Move into basic Java programming with a Java version of the Light-Bot game.
The Light-Bot World Top-Down
In Chapter 1 you played with the Light-Bot game, and even saw a textual representation for the graphical commands that the little robot obeys. Now it is time to turn those concepts into a full-fledged program that you can write yourself.
First, recall that Light-Bot is really just a form of micro-world: each "level" of the game is a miniature world that can be represented as a grid, and all of the objects--the robot, the blocks, the bue tiles that light up--occupy different locations on this grid. The flash game uses isometric projection to make the world look more three-dimensional, and animation to make it more attractive. For example, here is the second level of the Light-Bot game you saw in Chapter 1:
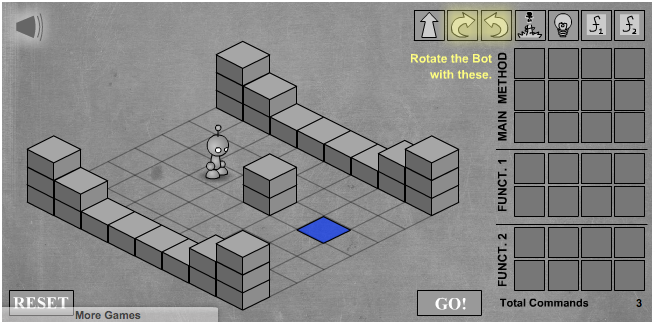
To simplify things somewhat, however, let's use a plain top-down view of the same situation:
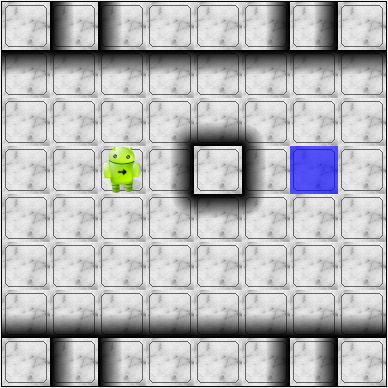
In this top-down view, it is much easier to see which direction is the x direction and which is the y direction, so we can keep our coordinates straight. Also, this picture highlights the fact that each Light-Bot level is an 8 x 8 grid. As another example, the third level of the Light-Bot game looks like this in the original:
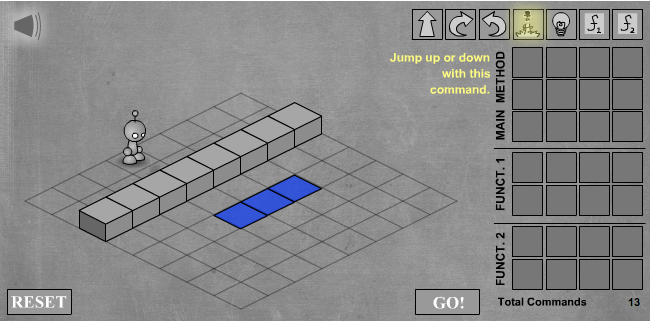
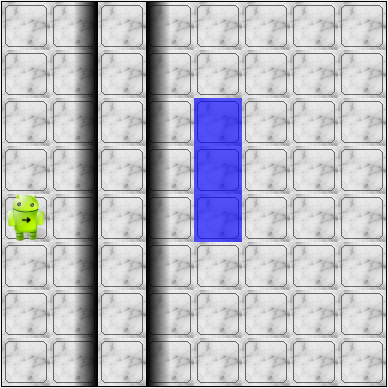
But the same level can be represented top-down like this:
Now that we have our "world" figured out, we can talk about writing source code to control the robot in it.
The Methods of a Light-Bot
Let's start our discussion of writing Light-Bot programs by recapping the basic commands that every Light-Bot understands. In Chapter 1, we saw that Light-Bots know how to perform seven basic actions or behaviors:
| Icon | Method | What happens |
|---|---|---|
 |
move() |
The robot moves forward one square (if it can) |
 |
turnRight() |
The robot turns 90 degrees to its right (clockwise) |
 |
turnLeft() |
The robot turns 90 degrees to its left (counterclockwise) |
 |
jump() |
The robot moves forward by jumping up one block higher, or by jumping down one or more blocks lower (if it can) |
 |
turnLightOn() |
The robot lights up the blue tile, if it is standing on one |
 |
f1() |
The robot carries out whatever sequence of actions you have
defined for the method f1 |
 |
f2() |
The robot carries out whatever sequence of actions you have
defined for the method f1 |
In an object-oriented program, we would model the Light-Bot, its world (the level we are playing), the blocks in the world, and the blue tiles as objects. Each object provides a set of behaviors that it understands, and these behaviors are implemented as methods. So the seven behaviors shown above that are understood by every Light-Bot are its methods. When we call a method (which is the same thing as invoke a method or send a message), we are requesting that an object carry out a specific method that we identify by name. Of course, to call a method, we have to know exactly which object we want to carry out the action.
Where Do We Write It?
All of the program code we write must go somewhere. But where do we put it? In an object-oriented program, all program statements go inside a method, and every method belongs to an object (or to a class, a family of objects that all understand the same methods).
The programming environment we will use in this course is called
Greenfoot4Sofia. It is a
customized version of Greenfoot that allows us to work with many
kinds of micro-worlds that we can also build and install as
Android applications. The
first time you start Greenfoot4Sofia, you can choose the
lightbot3 scenario from the tutorial, which is a project
based on Level 3 of the Light-Bot game. The initial view of the
project looks like this:
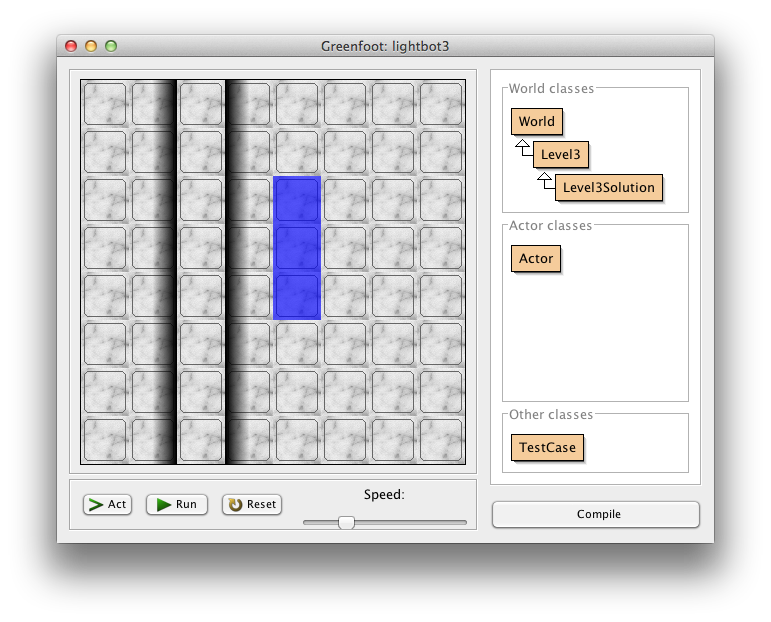
The main area of the screen consists of a top-down view of
the world, in this case Level 3 of the Light-Bot game. On the
right you will see an outline view of some of the important classes
of objects involved in the project. Here, the class
Level3 represents the world as you see it on the screen,
including the wall of blocks and the three blue tiles. The class
Level3Solution is what we are interested in ... and
what we will write. It is represents an object that
encompasses everything in the level and a Light-Bot that
solves the problem (lights up the three blue tiles).
Each Java class that you write will have its source code stored
in a text file. By clicking on the rectangular button for the class
in the outline view on the right of the Greenfoot4Sofia window, you
can see (and edit) your class source code in an edit window. If
you click on Level3Solution, you will see its contents:
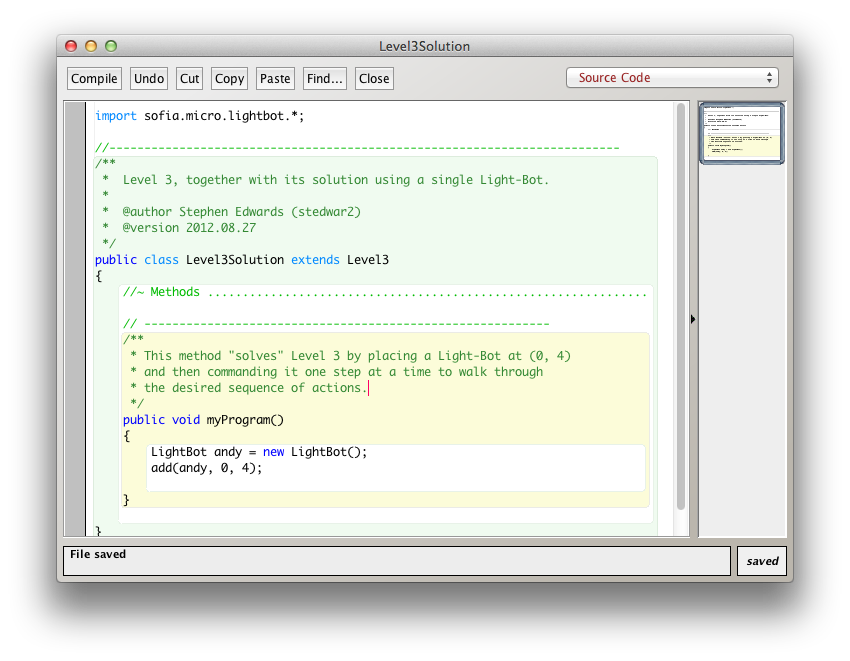
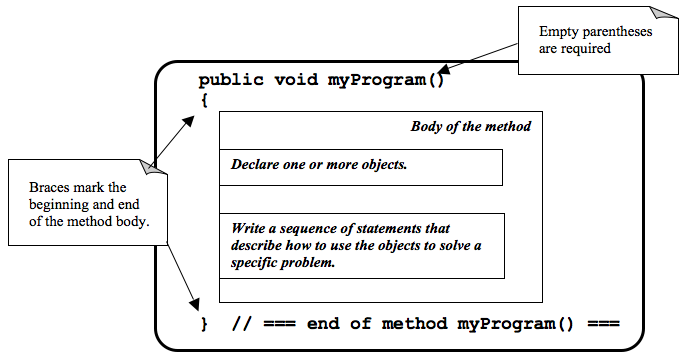
In the editor notice that a method has already been provided
to hold new code. This method is called myProgram(),
and it represents the behavior that will be carried out when you
press the Run button at the bottom of Greenfoot4Sofia.
This method has the following structure:
Creating New Objects
In order to call methods on an object to solve a problem, first we actually need an object! That means that creating the objects we need to solve a problem is part of our work in constructing a solution.
Sometimes, all we need to do is create and object, and that act by itself does what we need. But most of the time, we create an object so we can ask it to do things--call its methods. In order to call methods on an object, we need some way to refer to the object we are talking to. In most cases, we do this by introducing a name that refers to the object. These names are called variables (although we'll get more precise about that later).
It is common for these two tasks--declaring a new name, and creating a new object--to go together, and Java provides a convenient way for us to express this two-part pattern:
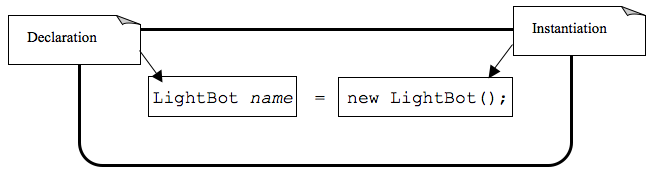
The is the syntax for declaring a new name and creating a
new LightBot object. The declaration portion
indicates that the programmer plans to use a LightBot
to help solve the problem at hand. The programmer must provide an
identifier (or name) for the LightBot object.
- An identifier (or name) in Java should start with a letter, which may be followed by other letters or numeric digits.
- We will use a lowercase letter as the first letter in an identifier when we are giving names to variables or methods.
- We will use a capital letter as the first
letter in an identifier when we are giving names to
classes (a class is a family of objects that all
understand the same methods, like
LightBot, which represents all the Light-Bot objects we can create--they all understand the same seven basic methods). - Java also allows underscores (_) and dollar signs ($) to be used in identifiers, but we will not use them in this course.
The instantiation portion of the figure above is
a request that the LightBot object be created. The
crucial part of the instantiation is the
constructor, which is a special
method used only to create new objects. The constructor in this
figure has the form LightBot(). It specifies the type
of object we want to create by giving the name of a class--here,
we are creating a new LightBot--followed by a pair of
parentheses. In Java, parentheses are always used following a name
when you are calling a method or calling a constructor. Later, we'll
see how values can be provided inside the parentheses to customize
the object that is being constructed.
Suppose we wish to create a new LightBot and we want
to refer to it by the name andy (a good name for an
android). Then we could declare the name andy and create
the LightBot with this statement:
LightBot andy = new LightBot();
We can place this inside our myProgram() method:
public void myProgram()
{
    LightBot andy = new LightBot();

    // ... more goes here ...
}
While this creates a new LightBot, we haven't said where to place
him in the world. Suppose we want to add andy to
the world at location (0, 4). We can do that using a method that all
world objects understand called add(), like this:
public void myProgram()
{
    LightBot andy = new LightBot();
    this.add(andy, 0, 4);

    // ... more goes here ...
}
Now it is time to try out your first program! If you have
typed these lines into Greenfoot4Sofia's editor, you may notice
that the Level3Solution icon in Greenfoot4Sofia's main
window has changed so that it has diagonal lines across it. These
indicate that the source code has been changed--because you typed
new instructions. Before the computer can execute our program,
however, we first need to convert the source code you wrote into a
form that can be executed by the computer. Click the "Compile"
button at the top of the editor window (or the "Compile" button
on Greenfoot4Sofia's main window). This will convert the source
code into a form the computer can execute. Finally, press the
"Run" button at the bottom of the Greenfoot4Sofia main window to
run the code you wrote.
OK, it isn't exciting, but you will see a new LightBot created
and added to the level at the coordinates you specified. You can
use the "Reset" button at the bottom of the window to throw away
the current world and start with a brand new fresh copy, and you
can use "Run" to run your program again. The "Act" button will
single-step your program, executing one action at a time sequentially
through myProgram() if you want to see what happens in
super-slow-mo. Alternatively, use the speed slider to speed up or
slow down how fast the actions are carried out while your code is
running.
Calling Methods on an Object
OK, so we've created a LightBot, but it doesn't
do very much. How do we request it to carry out actions?
An action statement is a request that an object perform a specific
task. That task can be either one of the basic action methods that
the object already knows, or it could be a new method that you wrote
yourself. The syntax of an action statement is:
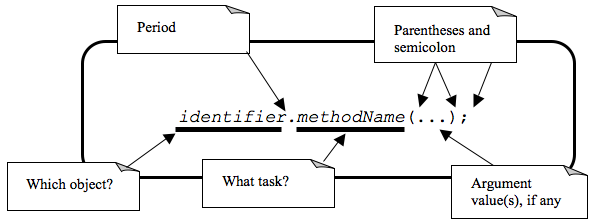
An action statement is also called a
method call statement, since
it calls a method on an object. The identifier to the left of
the dot identifies which object will receive the message--that is,
which object are we asking to perform the desired action. The object
that is receiving the message (the object we are calling the method
on) is called the receiver.
The methodName indicates which method we are asking the
object to perform. A method call in Java always includes a pair
of parentheses after the method name. For methods that require
extra information to do their job, we place the extra information
between the parentheses (the parameters to the method).
None of our LightBot methods require any extra
information, so all of their parentheses will be empty--but
the parentheses are still required.
So if we want andy to move forward, we can write the
corresponding action statement like this:
andy.move();
This method call consists of three key parts: the receiver
to the left of the dot, the method name to the right of the
dot, and the parentheses after the method name. In addition
to these three parts, notice the semicolon at the
end of the line. Just like the declaration and instantiation statement
we used to introduce the name andy, all statements in
Java end in a semicolon. Don't leave it off--it tells the computer
where each statement ends.
Putting it All Together
We can add the method call we just wrote to myProgram()
like this:
public void myProgram()
{
    LightBot andy = new LightBot();
    this.add(andy, 0, 4);

    andy.move();

    // ... more goes here ...
}
If you make this change, compile your code, and then run it, you
will see the robot be created and placed in its starting location, and
then move one square forward. To complete our solution, andy
needs to jump up on the wall, and then jump down:
public void myProgram()
{
    LightBot andy = new LightBot();
    this.add(andy, 0, 4);

    andy.move();
    andy.jump();
    andy.jump();

    // ... more goes here ...
}
Finish writing the rest of the instructions for andy
so that he can light up all the blue tiles.
A Word Making Code Easy to Read
When programmers write source code, they must pay particular attention to making it easy to read for other people. Most programmers work in groups, and other programmers need to pick up and work with existing code that may have been written by others a while ago--weeks, months, or even many years ago. As a result, it is crucial that source code be easy for other people to read.
One way we make our code easy to read is by choosing meaningful
names for all our identifiers. For example, Level3
represents the layout of Level 3 in the Light-Bot game, and
Level3Solution represents a solution to that specific
level layout. Similarly, the method names for the behaviors that
Light-Bots can perform are things like move(),
jump(), turnLeft(), and so on. The names
are chosen to match the behaviors so that little or no explanation
is necessary.
Another important tool in making source code easy to read is is commenting.
Some comments are critically important in source code because they explain to other programmers how to use a method or a class. In many programming languages, including Java, there are established conventions for writing these comments so that documentation about how to use your code can be automatically generated. You'll see plenty such documentation later, but for now let's get our toes wet with the basics.
// A pair of slashes side by side marks the beginning of a Java comment.
// Everything after them, including the two slashes themselves, is a comment.

// Sometimes, // is used to place a comment on the end of a line
// that also contains something else.  But more commonly, we'll see
// double-slash comments as single-line comments on a line by
// themselves.

/*
 * It is also possible to write a multi-line comment in Java by
 * starting it with a slash followed by an asterisk (/*).  Everything
 * from this marker onward, across as many lines as you want, makes up
 * a single comment.  The comment ends with a matching asterisk followed
 * by a slash, like this:
 */

// Finally, in Java there are specially marked comments that appear
// just before a name is declared, providing documentation about what
// that name means and how it is used.  All the comments above are
// plain old comments that mean nothing outside of the source file
// where they are written.  The following comment describes the purpose
// of a method, however, and can be used to generate documentation for
// it:

/**
 * This comment describes the purpose of this method.  It is called a
 * Javadoc comment.  You can tell it is different from other comments
 * because it starts with "/**", instead of just "/*".  You should
 * include this kind of comment just before each method you write, and
 * just before each class you write.  It should describe the meaning/purpose
 * of what immediately follows--here, the method called doSomething().
 * The Javadoc comment should also explain how to use the method or
 * class it describes.
 */
public void doSomething()
{
    // ...
}
For now, remember that you must include a Javadoc comment (that is, a description) for each method you write and for each class you write. We'll try to make this easier for you as we start, but it is a habit you'll have to become accustomed to (and that will serve you well!).
A third important tool for making code easy for others to read is indentation. Programmers use white space at the beginning of lines to show structure in their source code. You may have noticed that each of the methods shown in this Chapter starts with an opening brace ({), also called a left brace, a curly brace, a curly bracket, or just a curly. Each method also ends with a corresponding closing brace (}). Statements between these braces are inside the method--they are the statements that define what behavior occurs when the method is called. Because they are inside the braces (that is, inside the method body), we put extra spaces at the beginning of each line to show this nesting.
In this class, we will use all space characters to indent our code. We will indent lines that are "contained within" a larger structure by four spaces. You'll see that the editor automatically tries to help you keep this indentation habit as you write code, but it won't force you. Ultimately, you are responsible for making your code look clean, neat, and readable.